Looking for help with HMIS?
In this article, we will review how to build and run a CoC Annual Performance Report (APR) in the Homeless Management Information System (HMIS).
Step-by-Step Instructions
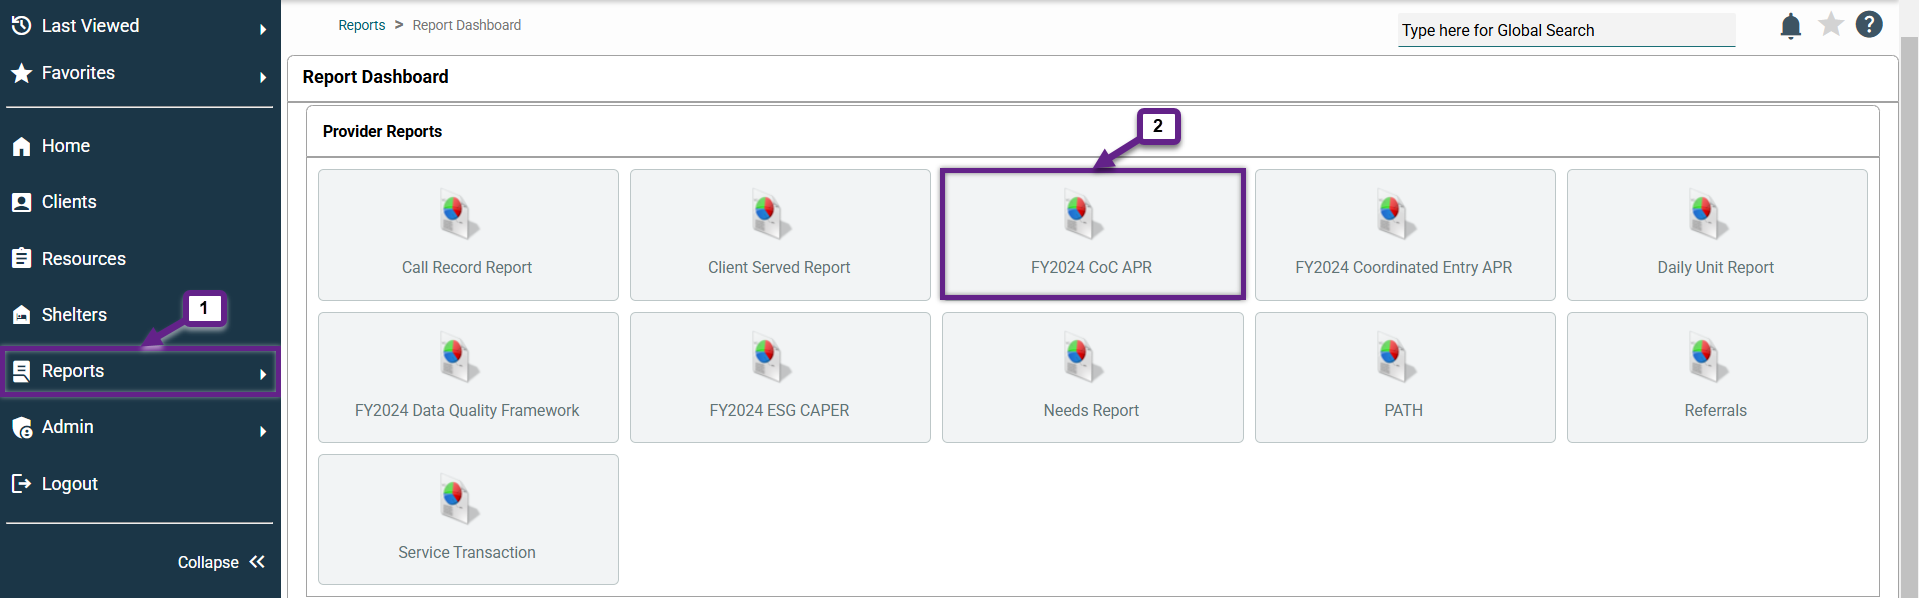
Step 1 – Navigate to the FY2024 CoC APR Report page in HMIS.
- Click on “Reports” in the left-hand navigation pane.
- Click on the “FY2024 CoC APR” tile in the middle of the screen.
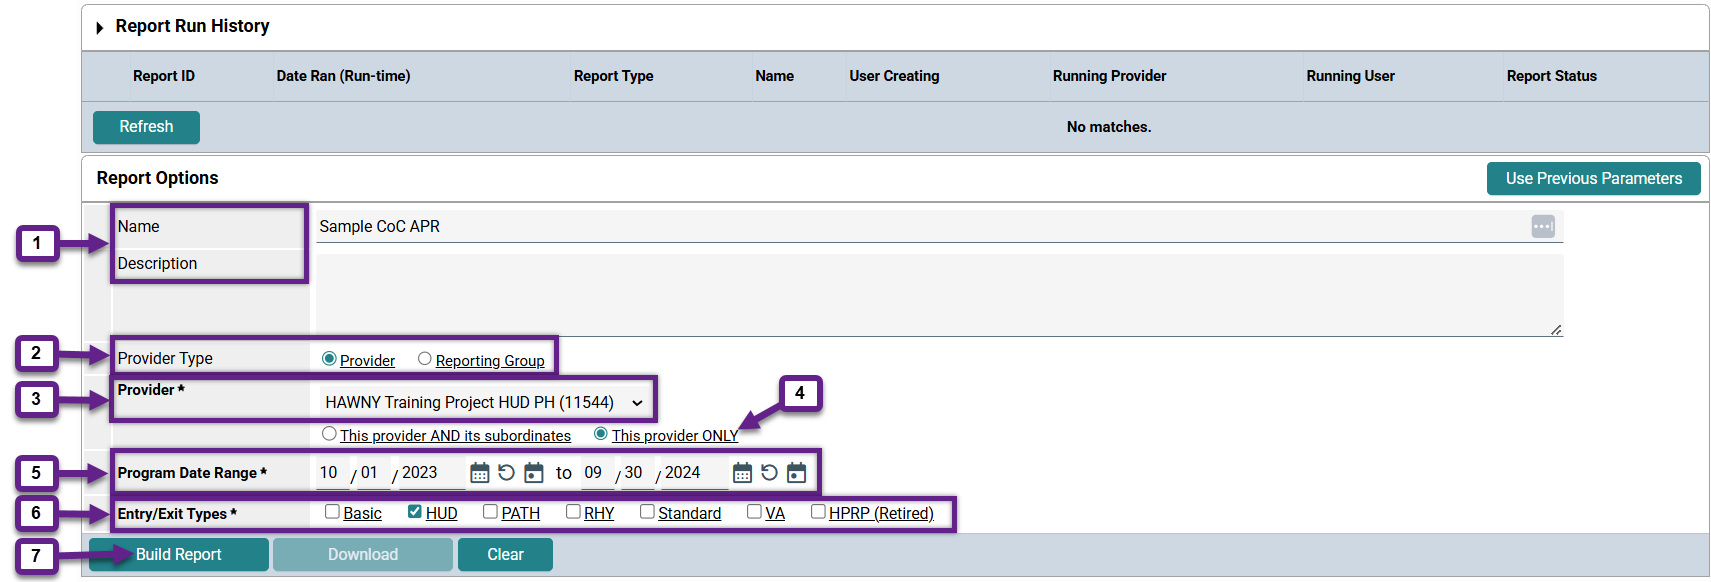
Step 2 – Enter the Report Options and build the report.
- Name and Description are not required fields, but can be completed to help identify a report if you need to return to it later.
- The Provider Type radio button will default to Provider – do not change it.
- Provider will default to whatever project you are currently working under. If the project displayed is not the project you want data for, you must go back and set Enter Data As to that project.
- Set the Provider radio button to This provider ONLY.
- Enter the first and last days of data you want HMIS to include in your report in the Program Date Range date fields.
- Select the Entry/Exit Type that your project uses. PATH, RHY, and VA funded projects use those Entry/Exit types. All other projects use HUD Entry/Exits.
- Click on the Build Report button.
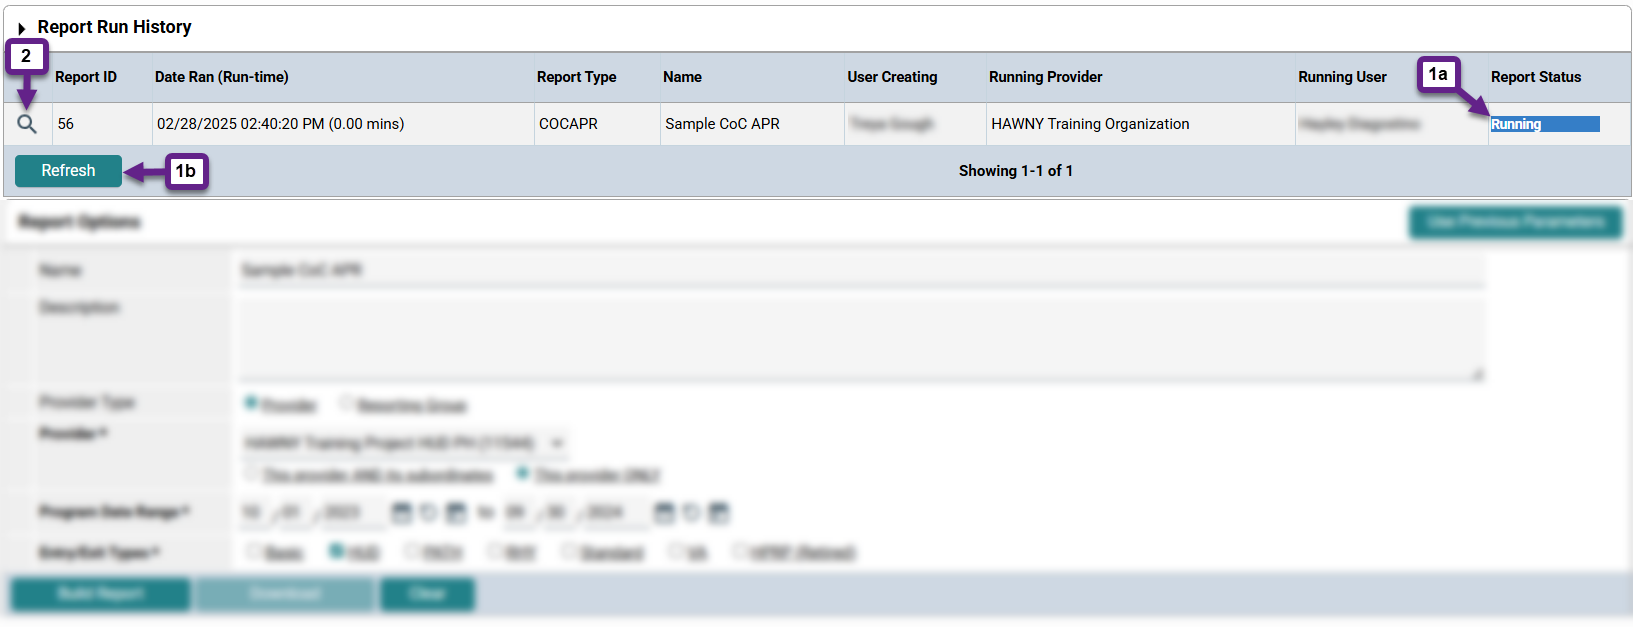
Step 3 – Refresh Report Run History and view the report.
- Once you click the Build Report button, a new row will appear in the Report Run History section above.
- a. Your report’s status will initially be blue and say Running.
- b. This page does not automatically refresh so you must click on the Refresh button until your report’s status changes to teal and says Completed. Reports are typically completed within a few seconds but could take up to a few minutes.
- Once your report is complete, click on the magnifying glass icon to view your report.
- a. The report loads below the Report Options section, scroll down to see your report.
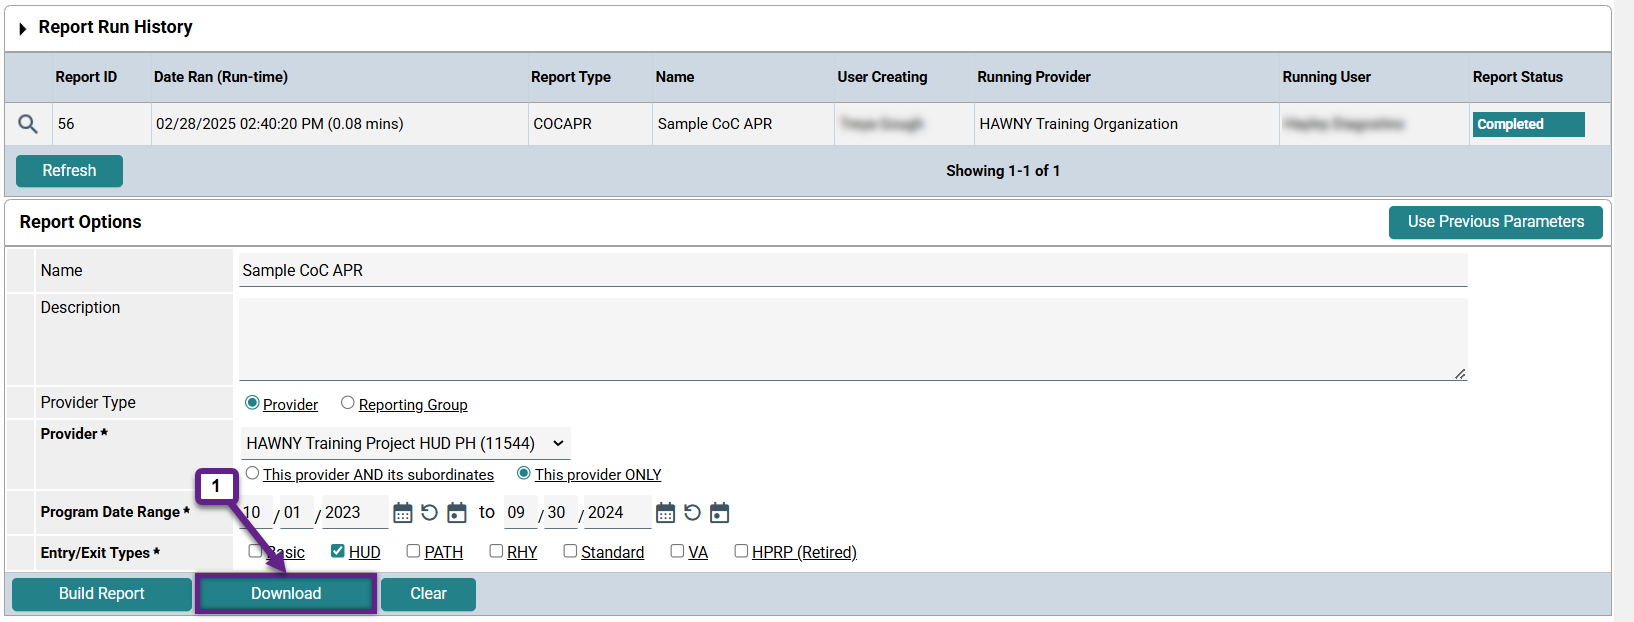
Step 4 (Optional) – Download the report.
- If you need to submit your report to HUD through SAGE, click on the Download button in the Report Options section after you have clicked on the magnifying glass to view the report.
- a. The report will download as one (1) .zip file with seventy-two (72) .csv files within it. Do not make any changes to the .csv files or SAGE will reject the report.
Additional Information
The APRs that you run will be accessible in your Report Run History for 30 days. You can return to this page and view previously run reports as often as you need to within that time period. Please note that it is generally best practice to re-run reports rather than view previously run reports because previously run reports will not show changes or updates to the data since the report was run. When run, the APR uses “live” data, meaning that the moment you click the “Build Report” button, the data for the APR is pulled directly from the database. This allows you to use the APR to identify data entry issues and errors, make changes to the data, and immediately confirm that the changes you made to those issues and errors by re-running the APR. If the data has changed, previously run reports may show incorrect data.
To re-run the APR
- Repeat steps 1-3 above, or
- Identify which APR in your Report Run History you want to re-run and click on the magnifying glass icon to view it.
- Click on the Build Report button.
- Once the new report is complete, click on the magnifying glass icon to view your report.
Report Structure
The APR is broken down into seventy-two (72) sections, also called questions. Each section has…
- Title
- Rows
- Columns
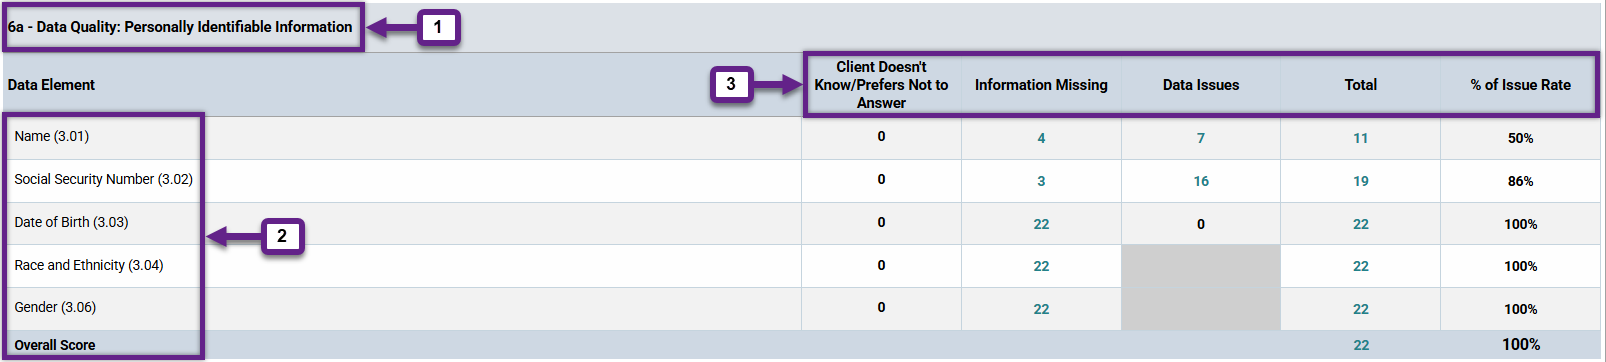
Within the sections, any cell whose number is teal is a hyperlink. When clicked, a list of the clients who met the criteria for that cell will appear.
These lists are particularly useful when reviewing and improving Data Quality and Project Performance. Each individual list can be downloaded to aid in this work, if desired. It will download as a .zip file with one (1) .csv within it.
![]()
Related Articles
Switching Between Projects (Enter Data As)
Monthly Data Quality Assurance (APR/CAPER)
Sharing HMIS Data (Client Privacy and System Security) – Coming soon!
Frequently Asked Questions (FAQs)
What dates should I use for the “Program Date Range”?
The APR can be run for any date range, from multiple years to just one day. The dates used are dependent on the reason you are running the APR. There are 5 main reasons why an APR will be run.
- Monthly Data Quality Checks: The APR should be run for the prior month (1st to last day).
- Quarterly Project Performance Assessment: The APR should be run for the past 12 months that ends with the last day of the most recently completed quarter (Jan 1 to Dec 31, Apr 1 to March 31, July 1 to June 30, and Oct 1 to Sept 30)
- Fiscal Year Data Clean Up: Fiscal years run from October to September (Oct 1 to Sept 30)
- Grant Year Data Submission: Like fiscal years, this will always be a 12-month time period but the dates are unique to every project. The administrators at your organization will know this date range for your project.
- Point in Time (PIT) Data Submission: The PIT is held in January every year. The specific date will change from year to year but will always be a 1-day time period.
How do I save the APR in this format?
The APR is not really intended to be used outside of HMIS except to upload your data when reporting to HUD. It is best to view the APR within HMIS and re-run it as you work to correct data entry errors. If you absolutely need to save the APR in this format you can print the webpage as a PDF or take screenshots.
What files/information am I allowed to download to my work computer?
All files that include Personally Identifiable Information (PII) about your clients should be kept in a secure location. For digital files this means keeping the computer you use to access HMIS and store client files safe with the following practices:
- Keep Passwords Safe: Don’t save passwords in an internet browser or password manager. Use coded messages if you need to write them down.
- Always Log-off: Always log-off of HMIS and your computer before leaving your work area.
- Use Protection: Make sure all the devices you use to access HMIS have the recommended software and security settings.
- Be Consistent: If you work remotely, use the same security practices offsite that you do in the workplace.
If you aren’t sure your work computer meets these safety guidelines, you should not access ANY client information from the device until you’re able to meet with your organization’s IT support. If you are a volunteer, or working for a small organization that doesn’t have IT, please contact HAWNY’s HMIS team for more information on cybersecurity compliance.
Still having trouble?
If you still have questions about running a CoC APR in HMIS, please contact the HMIS Administration Team at [email protected].