Looking for help with HMIS?
In this article, we will review how to correctly make changes to Income and Sources data within an Assessment (Entry, Interim, Annual, or Exit) in the Homeless Management Information System (HMIS).
Things to Know
Main Parts to Income and Sources
There are three main parts to the Income and Sources data.
- Overall Yes/No
- Total Monthly Income
- HUD Verification Transaction Box
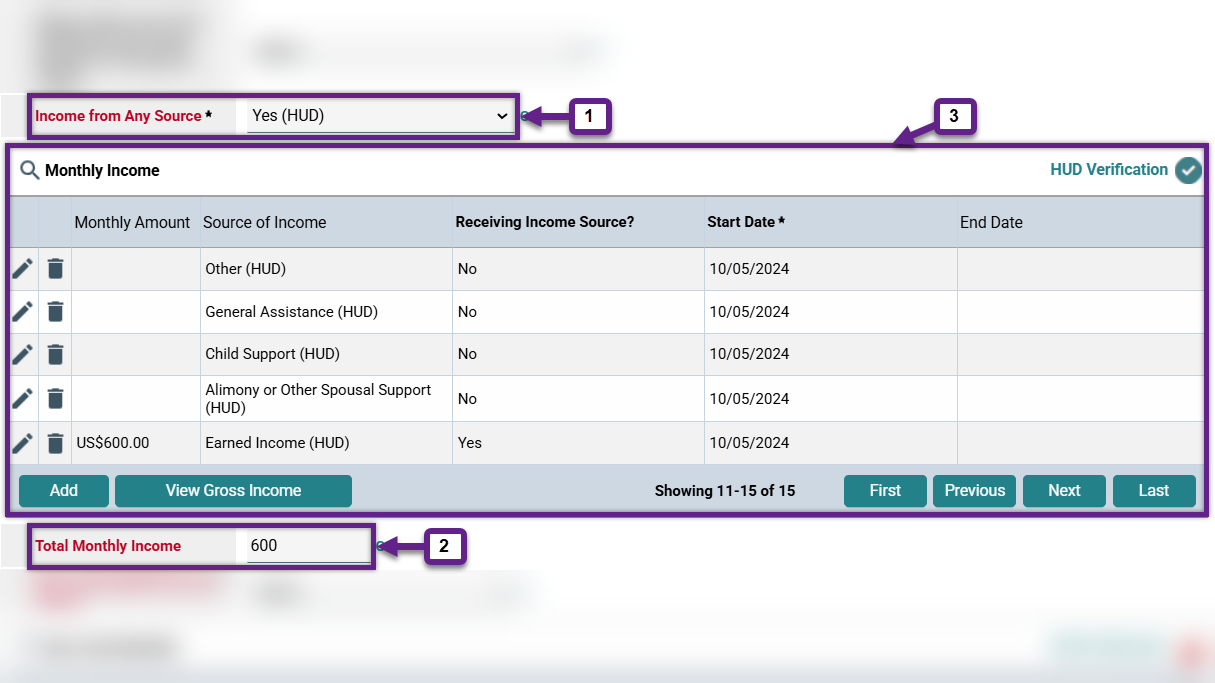
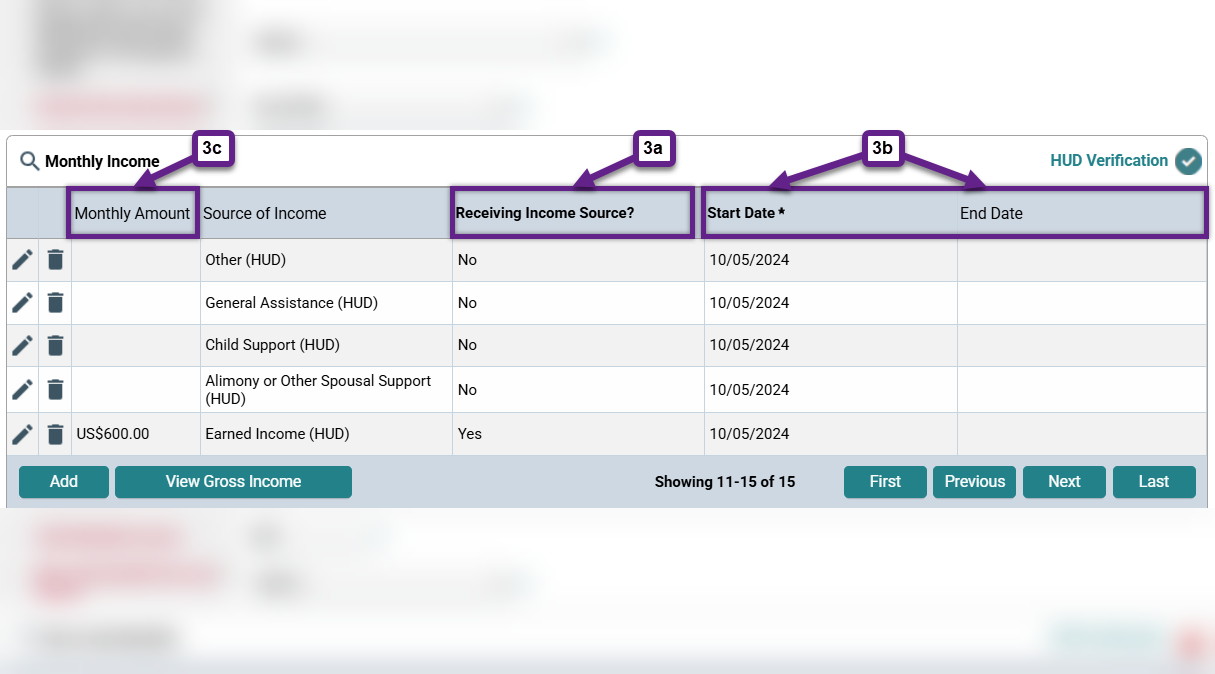
Three Parts to HUD Verification Transaction Box
The HUD Verification Transaction Box tracks if all Sources of Income have been verified/reviewed with the client. If an income source has been verified, it will show as a row within this box. There should be an Open Row for every Source of Income, even sources the client isn’t receiving, and each row should contain the following data points:
3a. Whether or not the client is currently receiving that source of income,
3b. the start and, and if applicable, end date for that source of income, and
3c. if receiving that source of income, the amount received each month.
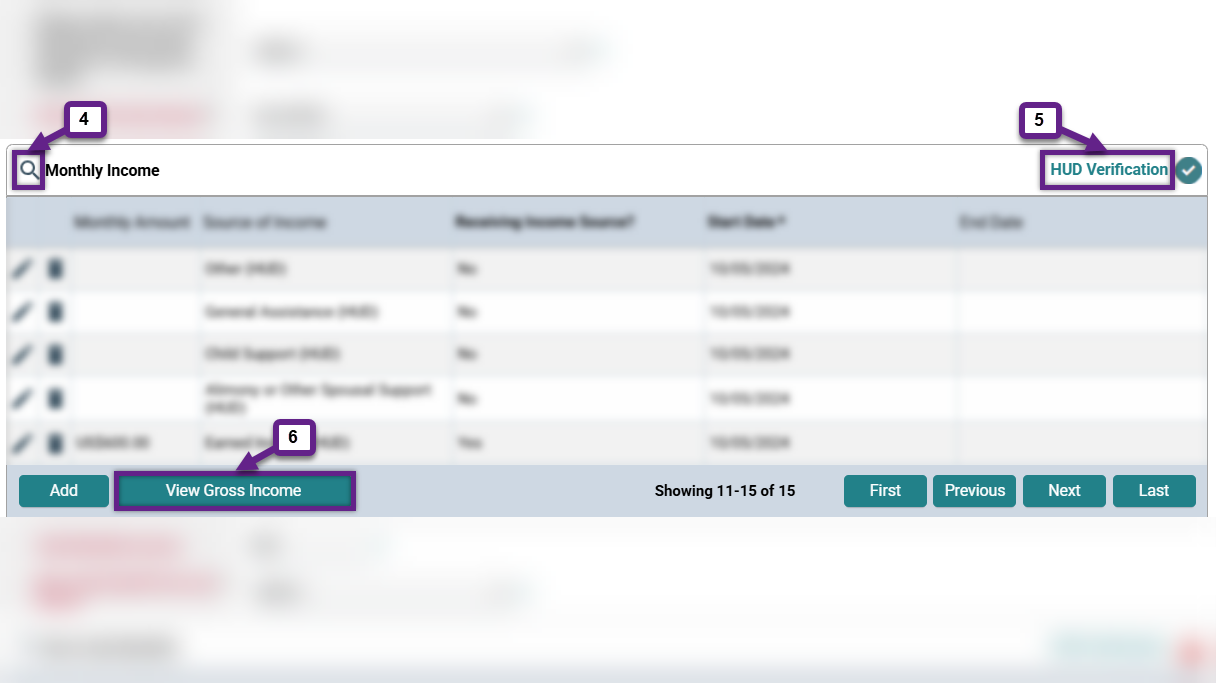
Three Shortcuts within HUD Verification Transaction Box
There are three shortcuts within the HUD Verification Transaction Box that help when reviewing Income and Sources Data.
4. Monthly Income View All
5. HUD Verification
6. View Gross Income
System Date
The System Date is either today’s date or the date you have set the system to by using Back Date Mode.
Open Row within HUD Verification Transaction Box
An Open Row is a row within the HUD Verification Transaction Box where the System Date:
- Is on or after the Start Date and there is no End Date, or
- falls within the Start Date and End Date.
Step-by-Step Instructions
This article is intended for HMIS users who are familiar with the basics of how to edit Entry Assessments and rows within the HUD Verification Transaction Box. If you need instructions for those steps use the links in the Related Articles section below.
Note: Before making any changes to your client’s income make sure you are using Enter Data As and Back Date Mode, if needed.
Client had no income and now has income
- Change the response to Overall Yes/No from “No” to “Yes.”
- Enter the total amount of income the client is now receiving in Total Monthly Income.
- For any Source of Income that the client is now receiving:
- Edit the Open Row for that income source and put the day before the new income started as the End Date. Leave “Receiving Income Source?” as “No.”
- Add a new row for that same income source and put the date the new income started as the Start Date, enter the Monthly Amount, and set “Receiving Income Source?” to “Yes.” Leave the End Date blank.
- The End Date of the row you closed should be the day before the Start Date of the new row.
Client had income and now has no income
- Change the response to Overall Yes/No from “Yes” to “No.”
- Change the total amount of income the client is now receiving in Total Monthly Income to $0.00.
- For any source of income that the client was receiving:
- Edit the Open Row for that income source and put the day before the income ended as the End Date. Leave “Receiving Income Source?” as “Yes.”
- Add a new row for that income source and put the day after the income ended as the Start Date and set “Receiving Income Source?” to “No.” Leave the End Date blank.
- The End Date of the row you closed should be the day before the Start Date of the new row.
Client still has income but the amount or source has changed
- Leave the response to Overall Yes/No as “Yes.”
- Change the amount Total Monthly Income from the previous amount to the new amount of income the client is receiving.
- If the client has lost a source of income entirely:
- Edit the Open Row for that income source and put the day before the income ended as the End Date. Leave “Receiving Income Source?” as “Yes.”
- Create a new row for that income source and put the day after the income ended as the Start Date and set “Receiving Income Source?” to “No.” Leave the End Date blank.
- The End Date of the row you closed should be the day before the Start Date of the new row.
- If the client has gained a new source of income:
- Edit the Open Row for that income source and put the day before the new income started as the End Date. Leave “Receiving Income Source?” as “No.”
- Create a new row for that same income source and put the date the new income started as the Start Date, enter the Monthly Amount, and set “Receiving Income Source?” to “Yes.” Leave the End Date blank.
- The End Date of the row you closed should be the day before the Start Date of the new row.
- For any source of income where the amount of income has changed:
- Edit the Open Row for that income source and put the day before the income amount changed as the End Date. Leave “Receiving Income Source?” as “Yes.”
- Create a new row for that income source and put the day the income amount changed as the Start Date, enter the Monthly Amount, and set “Receiving Income Source?” to “Yes.” Leave the End Date blank.
- The End Date of the row you closed should be the day before the Start Date of the new row.
Related Articles
Switching Between Projects (Enter Data As)
Changing the System Date (Back Date Mode)
Identifying and Correcting a Data Issue in a Project Controlled – Logic Based Field
Identifying an Income and Sources Data Issue
Adding Interim Reviews (Updates and Annual Assessments)
Correcting Interim Reviews (Updates and Annual Assessments)
Still having trouble?
If you still have questions about updating income, please contact the HMIS Administration Team at [email protected].