Looking for help with HMIS?
In this article, we will review how to add Monthly Income, Non-Cash Benefits, Insurance, and Disabilities information for New Clients in the Homeless Management Information System (HMIS). These are known in the system, as well as the HUD Data Standards, as HUD Verifications (however your organization probably doesn’t use this term day-to-day).
Step-by-Step Instructions
Step 1 – Find the HUD Verification section.
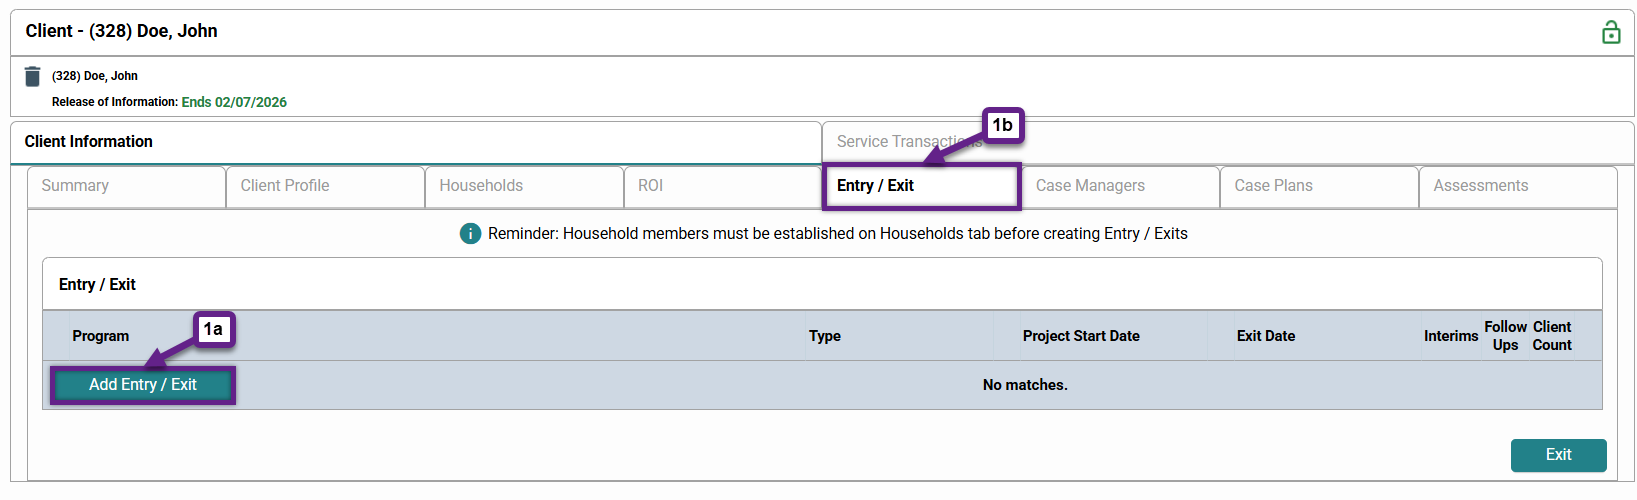
A project’s intake assessment is shown when you click “Add Entry/ Exit” (1a) under the Entry/Exit Tab (1b) of the Client’s Record*. Intakes should be created in HMIS on the same day the client completed their intake paperwork or using Back Date Mode.
* If you have access to more than one project in HMIS, please use Enter Data As to make sure you are adding an Entry/ Exit for the correct project.
Most HMIS projects organize their intake form in the same way:
- Demographics
- Prior Living Situation (Housing History)
- Project Information
- HUD Verifications
- Domestic Violence Background
- Local Data Elements
- Coordinated Entry Data
Which HUD Verifications are you looking for?
There are four types of HUD Verifications that may be displayed on your project’s intake form, depending on your funder requirements.
- Income
- Non-Cash Benefits
- Insurance
- Disabilities
Each box is formatted the same way:
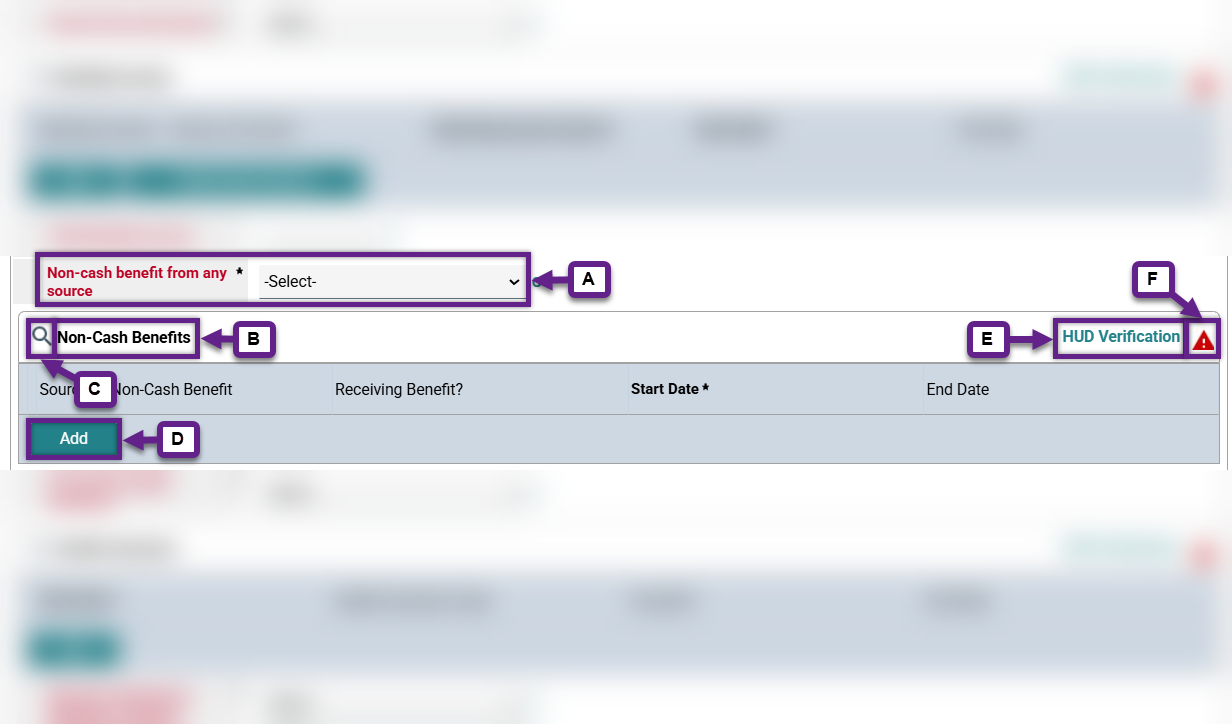
A. Overall Yes/No: This question should indicate if there are any “yes” responses in the associated HUD Verification box. There will be a data error on the project reports if the option you chose from the dropdown menu doesn’t match the answers inside the HUD Verification box.
B. Verification Type: HUD requires verification of whether clients have access to certain benefits or have disabling conditions using these transaction boxes. Depending on your project’s set up you may have additional transaction boxes on your intake assessment that do not include a HUD Verification Shortcut/ Status. These additional boxes will not be discussed in this article.
C. Review all records of this type: This magnifying glass icon is useful for reviewing and editing the existing records within this HUD Verification box. Clicking will expand the HUD Verification box into a large pop-up window.
D. “Add” Record: If you prefer to add each HUD Verification record one at a time, this button will allow you to. However, there is no confirmation on this screen once all of the required records have been added. You will need to use the HUD Verification Status icon in combination with the Shortcut link to identify which, if any, records are missing.
E. HUD Verification Shortcut: This link is useful for adding all HUD Verifications for the first time, particularly when most or all of the responses are “No.” Clicking will open a pop-up window that gives you the ability to set all record types to the same answer of “No.” If the HUD Verification Status is indicating that the box is currently missing records, this pop-up can be used to find which record type is missing an answer.
F. HUD Verification Status: This icon indicates whether or not all of the types of records have a “yes” or “no” response.
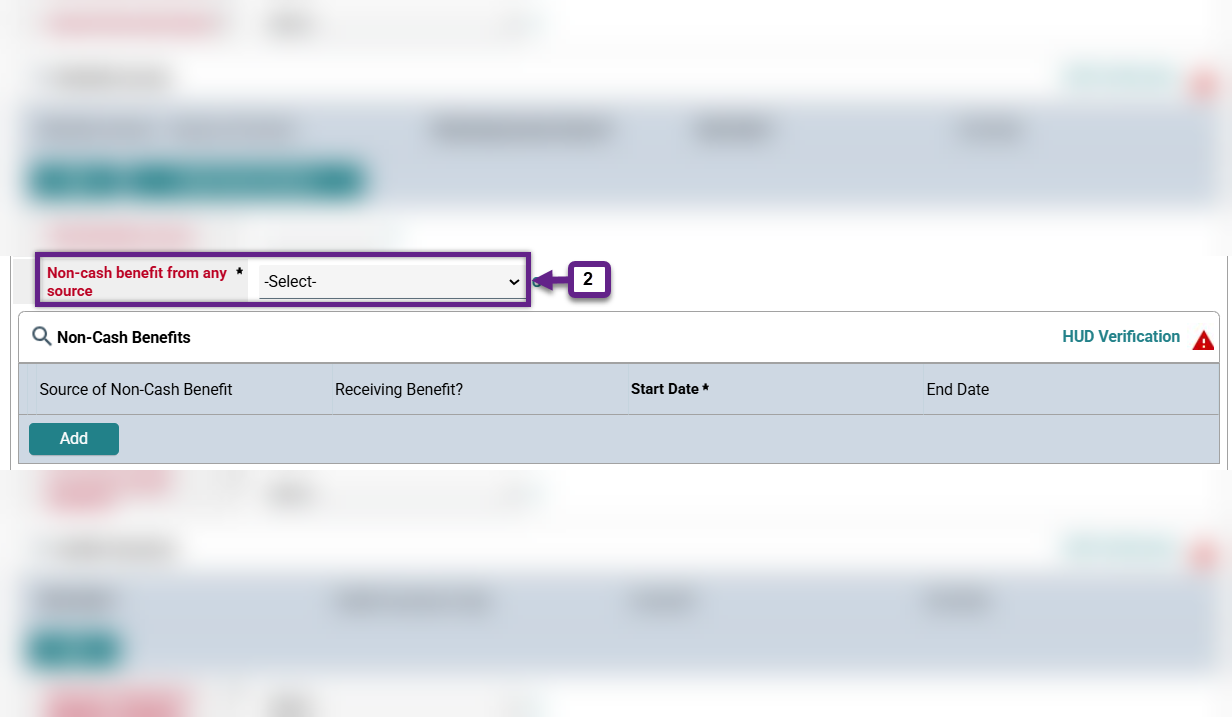
Step 2 – Answer the required, “Overall Yes/ No” question.
These questions may be above or below their matching HUD Verifications box.
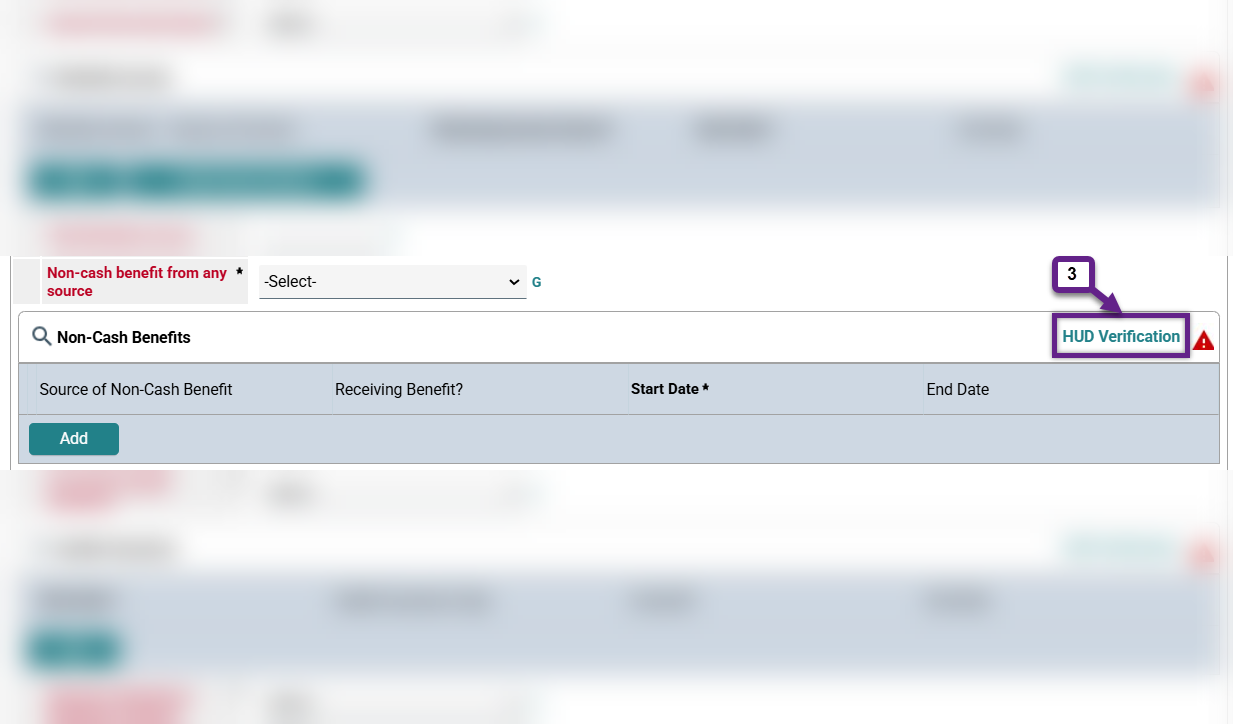
Step 3 – Click on the HUD Verification Shortcut.
This link is located to the far right of the HUD Verification box. You can use this screen to either set all record types to the same answer of “no” or troubleshoot a partially complete intake assessment to find which record type is missing an answer.
Step 4 – Use the “No” radio button at the top of the window.
This will set all blank record types to the same answer:
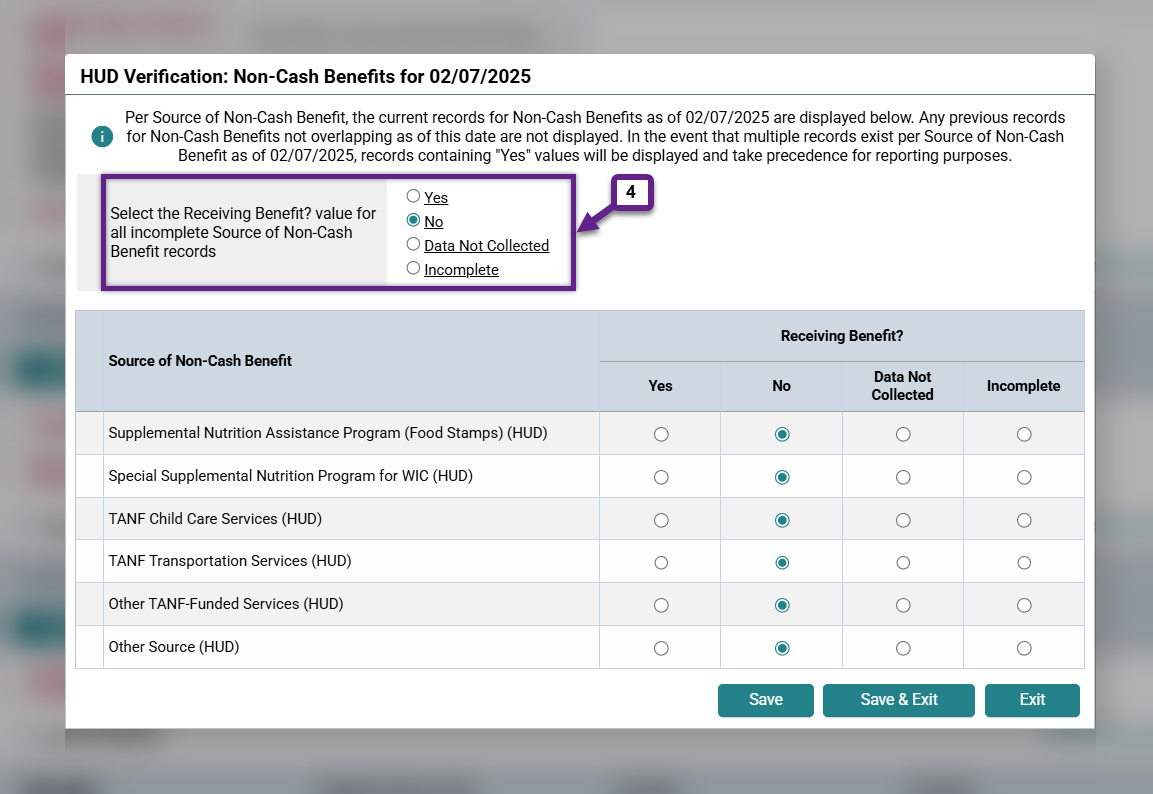
Step 5 – To change a record type to “Yes”, use the buttons to the left.
Make sure that all yes and no responses have been transferred from the paper intake form.
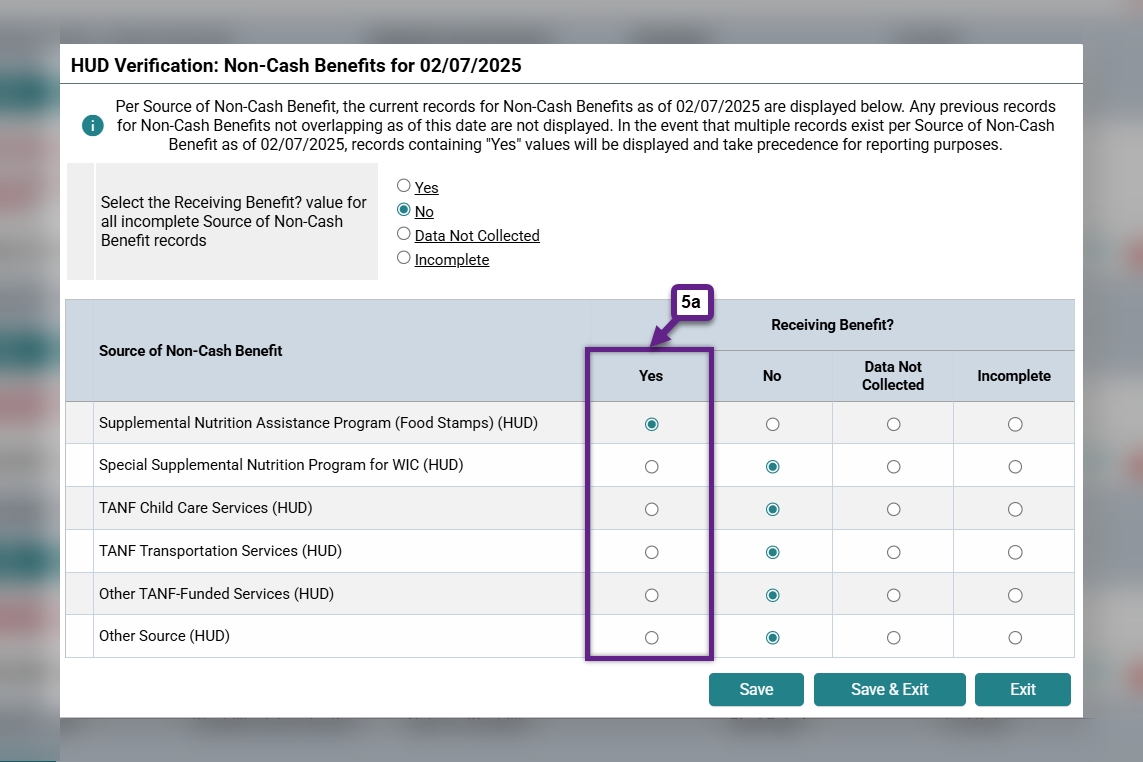
To remove the red caution icon from the HUD Verification Status make sure that “Data Not Collected” or “Incomplete” are not selected for any record types.
![]()
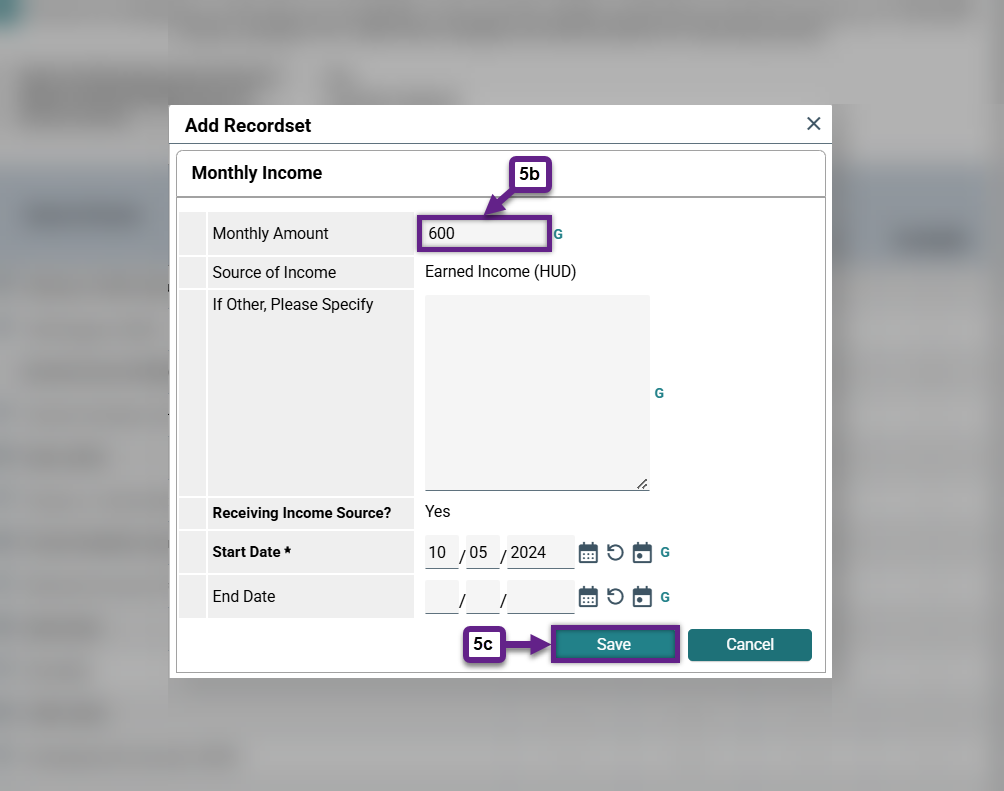
For Income Records
If the client is receiving monthly income from any of the sources listed in the Income HUD Verifications Box you will need to also add the amount after selecting “Yes” for the appropriate record type.
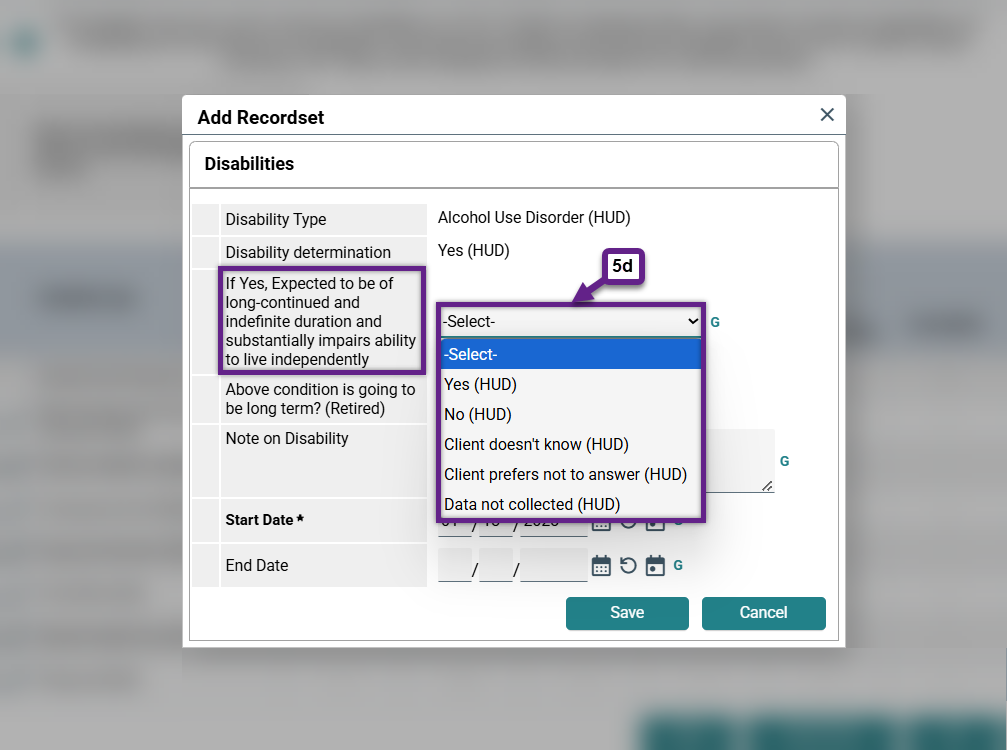
For Disability Records
If the client has answered “yes” for one or more disabling conditions you will need to answer a follow-up question on the expected length and impact of the condition:
For both Income and Disability records, once you have answered all of the required information on the pop-up window, click “Save” to continue.
Step 6 – Exit the pop-up window and check the HUD Verification Status.
If all record types have an answer of “yes” or “no” you should see a green check mark icon indicating that the records have all been verified.
![]()
Frequently Asked Questions (FAQs)
What should I use as the “Start Date”?
Since these questions are considered a “self-report” by the client, the intake date can be used as the start date in most cases. If you are entering data using the correct date, then the “Start Date” that HMIS fills in automatically should be the same as the intake date.
When should I add an “End Date”?
There are only two reasons to add an “End Date” to a record.
- If a “yes” for a specific type of record changes to a “no.” For example, if a client is no longer receiving any earned income because they are unemployed, the previously given “yes” that is logged in the HUD Verifications box must be given an end date that matches the date the client was terminated. A new row for that type of record must then be created with a start date of the day after the client was terminated and a “no” response.
- If, the amount for a specific type of income changes. For example, if the amount of SSI a client receives changes the original SSI row must be given an end date for the day before the amount changed and a new “yes” row for SSI must be created with the new amount and a start date of the day the amount changed.
When should I change a “yes” response to a “no”?
Do not ever change a “yes” response for a specific type of record to “no.” Instead, add an end date to the “yes” row and create a new row for that specific type of record with a “no” response.
Related Articles
Switching Between Projects (Enter Data As)
Changing the System Date (Back Date Mode)
Adding Interim Reviews (Updates and Annual Assessments)
Still having trouble?
If you still have questions about Creating HUD Verifications in HMIS, please contact the HMIS Administration Team at [email protected].