Looking for help with HMIS?
This article reviews how to document a client’s choice on their HMIS Release of Information (ROI) form within HMIS. An ROI that is signed or verbally consented to allows client data to be shared across agencies within HMIS. The ROI can facilitate client services through ease of communication and access between agencies.
Step-by-Step Instructions
Step 1 – Use Enter Data As and Back Date Mode (if necessary).
- Enter Data As should be used to select the project that the client is enrolled in. This is necessary to use if you have access to more than one project in HMIS.
- Back Date Mode should be used to set the system date to the date the ROI started. If the ROI starts on the present date, using Back Date Mode is not necessary.
Enter Data As example: If you have access to two RRH projects, projects ABC and XYZ, and the client is entering project ABC, be sure to use Enter Data As to enter data under project ABC. When you have access to multiple projects, always choose the one the client will be receiving services from/the one you are entering data for.
Back Date Mode example: If the current date is 03/01/2024 and an ROI has a signed date of 02/27/2024, set Back Date Mode to 02/27/2024 before adding the ROI.
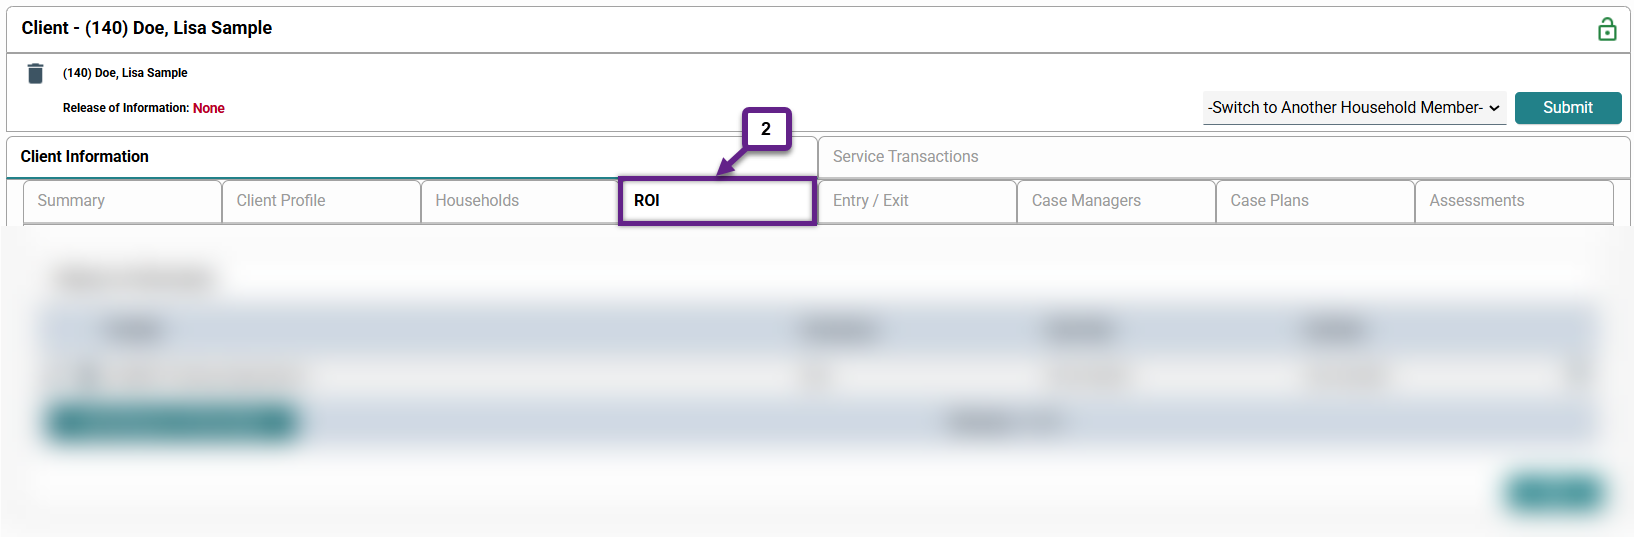
Step 2 – Locate the “ROI” tab within a client’s profile.
Go to the record of the client. Click the “ROI” tab (2) along the banner within the client’s record.
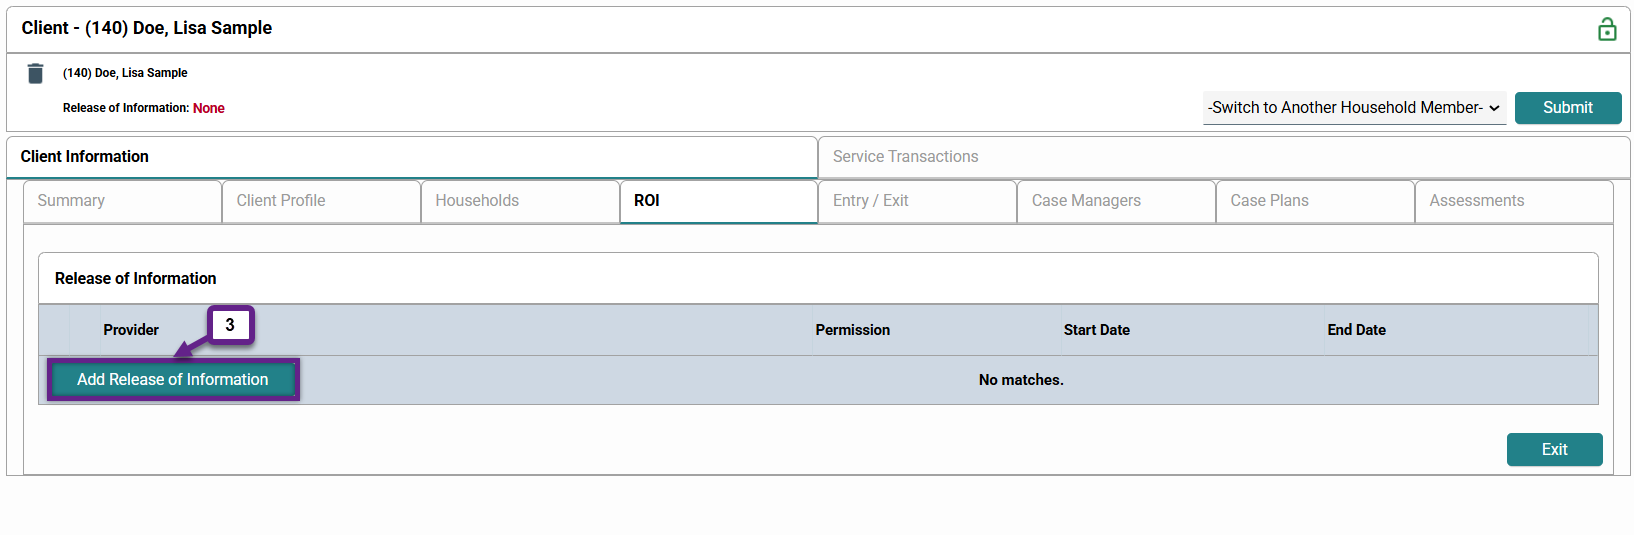
Step 3 – Add a new ROI.
To add: Click the button labeled “Add Release of Information” (3) within the ROI tab.
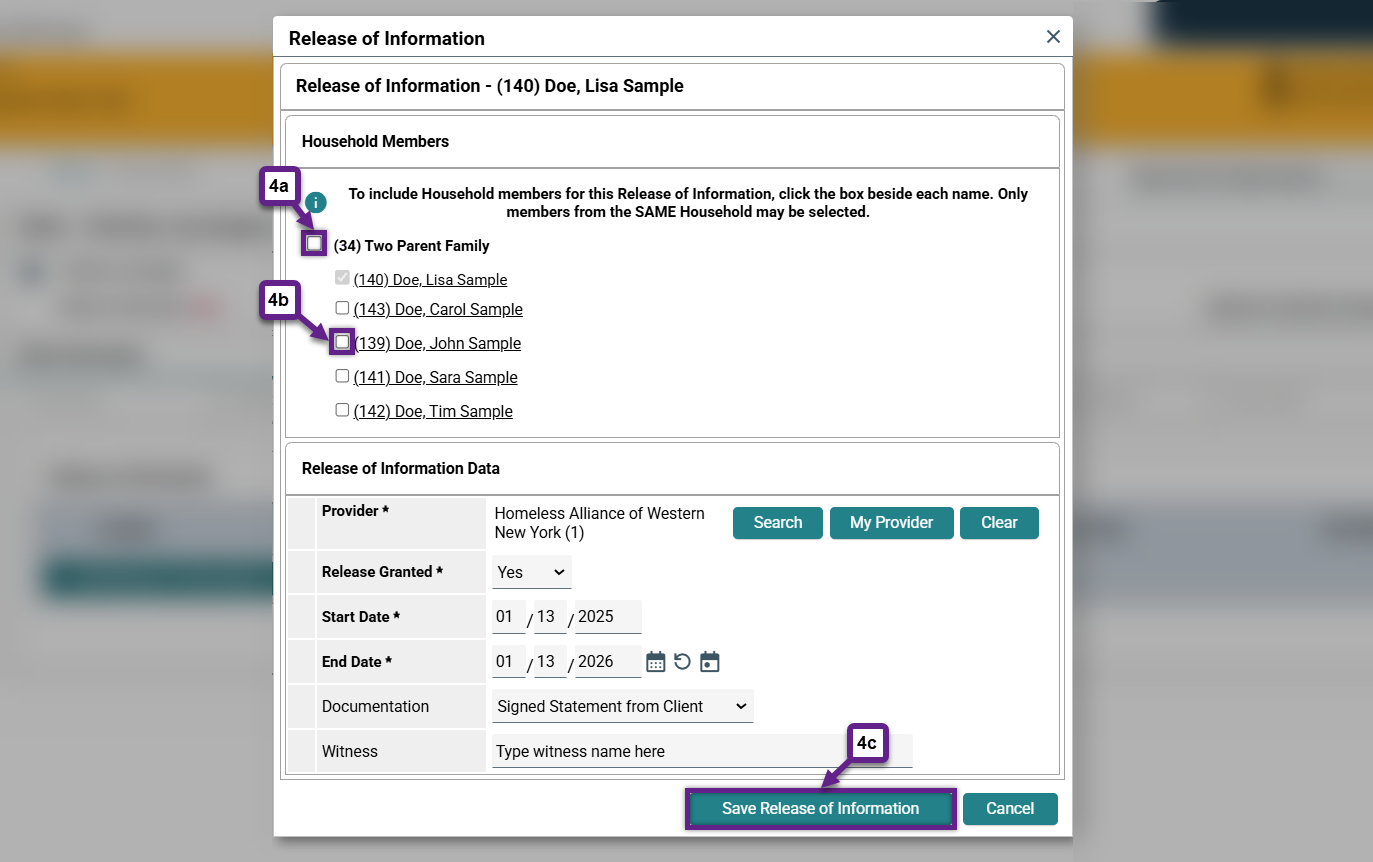
Step 4 – Enter the required information.
Reminder: If you have access to more than one project in HMIS, you should be using Enter Data As to enter data under the project the client is enrolled in. Also, you should be using Back Date Mode to set the system date to the day the ROI was consented to if that day occurred before the day you are adding the ROI to HMIS.
A new window will appear that prompts the user to enter information regarding the ROI. Required fields are marked with an asterisk (*). Although not all fields are required, it is helpful to add all known information.
- Household members: If the ROI applies to the entire household, check the box next to the household (4a). If the client has requested the ROI only apply to certain members, check the box(es) next to the appropriate member(s) (4b). Each adult in the household must decide whether or not they wish to consent for themselves and fill out their own physical ROI form; one adult cannot sign for another adult. A parent or legal guardian is permitted to make this decision and complete an ROI for household members under 18, or if they have the legal authority to do so. For information on how to add or edit a household, see Adding and Editing Households.
- Release granted: Select the appropriate response from the drop-down menu.
- Start date: The start date is the date that the ROI was signed or verbally consented to. Enter the start date in the appropriate format (MM/DD/YYYY).
- End date: Enter the end date in the appropriate format (MM/DD/YYYY).
- Documentation: Select the appropriate response from the drop-down menu.
- Witness: If known, enter the full name of the employee that witnessed the client sign or verbally consent to the ROI
Once all of the information has been entered, click “Save Release of Information” at the bottom right of the window (4c).
Related Articles
Switching Between Projects (Enter Data As)
Changing the System Date (Back Date Mode)
Frequently Asked Questions (FAQs)
Does each member of a household need to have their own ROI?
Yes, each individual member of the household must document if they give consent or decline consent to the ROI. A parent or legal guardian is permitted to make this decision for household members under 18, or if they have the legal authority to do so. For information on how to add or edit a household, see Adding and Editing Households.
Does the ROI start date in HMIS need to match the start date on the ROI paperwork?
Yes, the ROI start date in HMIS should be the same date as stated on the ROI paperwork. If that date occurs before the date you are entering the ROI in HMIS, use Back Date Mode to enter it on the appropriate date.
My client gave a verbal consent at intake, can I enter the ROI in HMIS without a paper form?
Yes, you can enter the client’s verbal response to the ROI in HMIS and mark it as a verbal consent with a witness. However, as soon as the client is available to sign a paper ROI you will need to get that completed and you should note on the paper form that the ROI applies back to the date they gave the verbal response.
Can I add the ROI in HMIS after the project entry date?
Adding a project entry before adding an ROI is not best practice and should be avoided. The ROI should always be documented and entered into HMIS before a project entry.
If a situation arises where a project entry is entered into HMIS before the ROI, the ROI can be added using Back Date Mode. This is provided that there is documented, explicit permission from the client that they consent to data sharing beginning on or before their project date. It must be clear to the client that their documented consent begins on a date that might be in the past.
What should I put as the End Date for the ROI?
The end date of the ROI can vary depending on the typical time a client is anticipated to be in a project or receiving services. Individual agencies or organizations are able to select any length of time, as long as the client agrees to consent for that particular duration.
What if a client revokes their consent for the ROI?
If a client wishes to revoke their consent, they will need to make a request in writing. Regardless of the original end date documented for their ROI, the end date will be changed to when the client revoked their consent, and the client’s information will no longer be shared between agencies from that point forward.
Still having trouble?
If you are still having issues adding a ROI, please contact the HMIS Administration Team at [email protected].