Looking for help with HMIS?
Homelessness Prevention (HP) Master Workflow
The Master Workflows have been created by the HMIS administration team for each project type to help our users enter data into HMIS with the least amount of data quality issues. All Master HMIS Workflows should be considered best practices for your team.
Introduction to Homelessness Prevention (HP) Projects
HUD-funded Homelessness Prevention (HP) projects are designed to prevent an individual or family from experiencing homelessness. These projects are designed to provide services that include:
- Short- and Medium-term Rental Assistance (tenant-based or project-based)
- Rental Arrears
- Rental Application Fees
- Security Deposits
- Advance Payment Of Last Month’s Rent
- Utility Deposits and Payments
- Moving Costs
- Housing Search and Placement
- Housing Stability Case Management
- Mediation
- Legal Services, and
- Credit Repair
In the following resource we will be focusing on the requirements for Homelessness Prevention (HP) projects that are funded through the Emergency Solutions Grant (ESG) program. Projects funded under the Housing for People with AIDS (HOPWA) program, New York State’s Solutions to End Homelessness Program (STEHP), or Veteran Affairs’ Supportive Services for Veteran Families (SSVF) program may have additional requirements.
What data elements do Homelessness Prevention (HP) projects collect in HMIS?
According to official guidance from HUD, the Homelessness Prevention (HP) teams’ first goal is to prevent people from experiencing homelessness by helping them keep their current housing, or move. These elements should be used as milestones to measure progress with the client, not tasks to be completed as quickly as possible.
Project Start Date
The project start date is when the client first started working with the project and received services for the first time.
Homelessness Prevention (HP) teams are required to create a project entry in HMIS on the project start date if they are funded through…
- The US Department of Housing and Urban Development (HUD)
- New York State’s Solutions to End Homelessness Program (STEHP), or
- The Veterans Affairs (VA) Administration
All required data elements should be complete when the intake is added on the Project Start Date to avoid any data quality issues on the project’s reports.
Interim Reviews
Interim Reviews should be added to HMIS any time the team is informed of a change to the clients’
- Monthly Income
- Non-cash Benefits
- Insurance, or
- Disability Status
Check Requests (for ESG-funded projects)
Homelessness Prevention teams funded through the ESG program should use the Check Request Tool on the Assessment Tab to record any financial assistance given to the client, the amount, and who should have received it.
Service Transactions (for HOPWA- and VA-funded projects)
Homelessness Prevention teams funded through HOPWA or VA programs should create Service Transactions anytime a service is provided to a client. There are two types of Service Transaction types that should be used…
- Services Provided
- Financial Assistance
Financial assistance should always include the amount of the check and who should have received it.
Project Exit Date
The client’s project exit date is the day the client is no longer receiving services from the project. This can be triggered when the client…
- Leaves the area
- Is no longer eligible for homelessness prevention services
- Engages with another homelessness prevention project
- Is deceased
- Has not had a recorded contact in the past 60 days
Homelessness Prevention teams are encouraged to review all their project’s enrolled clients for these triggers at least once every 30 days to exit those who are no longer receiving services.
Step by Step Master Walkthrough
This section will help you follow best practices for Homelessness Prevention projects while working in HMIS. In this document we will answer the questions “What should I do next?” and “When should I do this task?”.
HMIS Homepage
You will always start from the HMIS homepage after logging into the site.
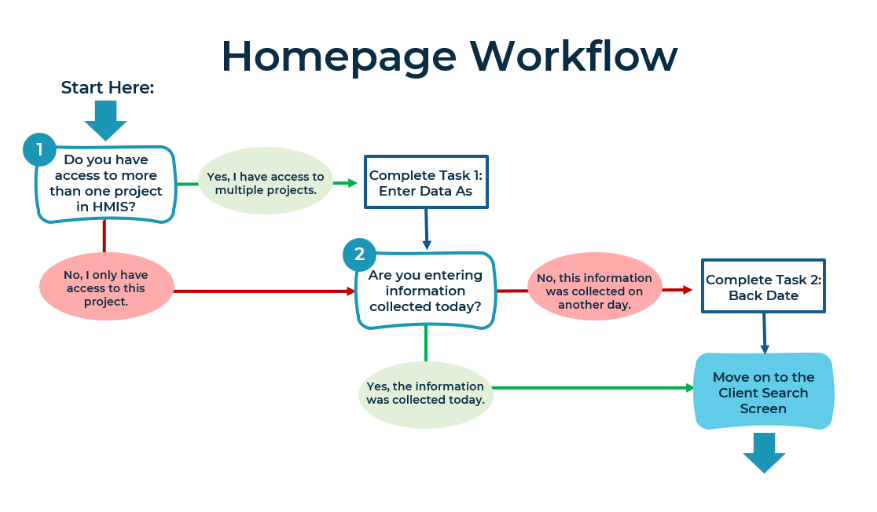
Task 1 – Enter Data As (if applicable)
If you have access to multiple projects in HMIS “Enter Data As” must be used to both read the profiles of clients who are currently open in your project, as well as when you are entering new information. Choose the correct project from the list provided.
Task 2 – Back Date Mode (if applicable)
Back Date Mode should be used whenever you are adding information to a client’s profile that was shared on a day in the past. This tool will allow you to set the system date to the correct day. If the information was given to you on today’s date and you are entering it on the same day, you will not need to use Back Date Mode.
Client Search Screen
You will always begin by searching for the client, either using an HMIS Client ID number, or the details provided during the intake process.
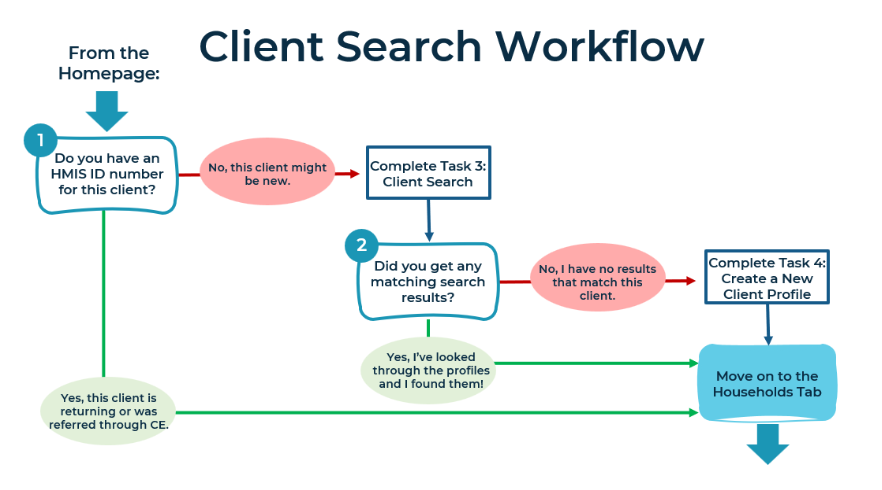
Task 3 – Client Search
If you do not have an HMIS Client ID number for this client, you will need to use their personal information to search HMIS for any existing client records that may match this person. Use as many details as you have to ensure you pull all records that might match your client.
If you have several records that might match this client in the search results, use the Summary and Client Profile Tabs within each record to view additional information that might help you select the correct record.
Task 4 – Creating a New Client Record (if applicable)
If none of your search results match the client’s information, you may create a new record using the information entered in the search.
Client File: Households Tab
Households should only be used if this client lives with others (ie – couples, families, etc). You do not need to create Households for singles.

Task 5 – Household Search (if applicable)
The household search will search for those with a matching last name to the client. If you find a match…
- Check the type. Does this match the household situation that the client is currently living in?
- Check the household members. Is everyone currently living in the household listed in HMIS? (Don’t worry about extra members that aren’t living with the household anymore as long as the Household type is correct and all current members are listed. You will be able to select the specific individuals needed when creating the Project Entry.)
If no households are found, use the Start a New Household button to get started.
Task 6 – Creating and Editing Households (if applicable)
Once you’ve created a new household and identified the type (ie- couple without children, two parent family, single parent family, etc) you will need to use the Client Search screen to add family members. This process will be identical to Tasks 3 and 4.
Additionally, if you have an existing household of the right type that is missing any members, you can use this household set-up screen to add more individuals using the Client Search. Once all current members of the household have been added to the list, you can continue on to create their project entry.
Client File: ROI Tab
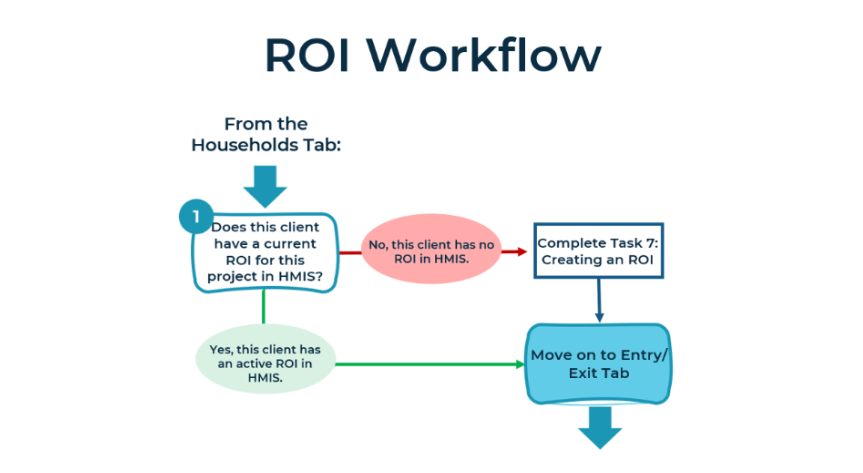
Task 7 – Adding a Release of Information (ROI)
The Release of Information (ROI) for your project must be entered into the system before any information is added to the Entry/Exit Tab. Adding a release to the system (either yes or no) means that you have already collected the signed HMIS Release of Information (ROI) and Client Consent form from all adult members of the household.
- If your client is part of an HMIS Household that they are not currently living with, do not check the boxes to include the household.
- If your client’s household includes members that are no longer living with the household, do not check the boxes to include those individuals.
Client File: Entry/ Exit Tab
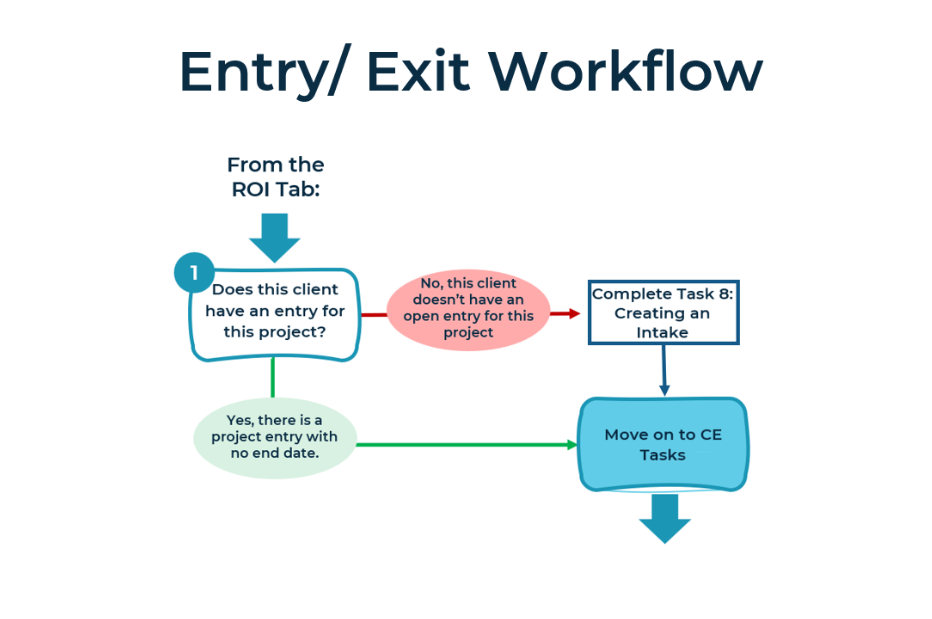
Task 8 – Creating an Intake (Entry/Exit Tab)
Adding a Project Entry
Each client should only have one open entry per project at a time (meaning an entry without an end date). The project entry should be created on the day the client completed the intake forms, or entered using Back Date Mode on the day matching their intake date. On the creation screen, choose the type of form that matches the project’s grant funding.
Filling in the Intake Assessment
Intake Assessments must be completed for each member of the household. Your project’s HMIS intake form is customized to the project’s funding requirements, as well as any special questions requested by your organization. This form should match the physical intake form completed by the client.
Most project intake forms are organized as:
- Demographics
- Housing History (Prior Living Situation)
- HUD Verifications (Income, Non-Cash Benefits, Insurance, Disabilities)
- Federal Partner-specific Data Elements (if applicable)
- Organization-specific Data Elements (if applicable)
- Engagement Date
- Coordinated Entry (CE) Data
What should I do with the Coordinated Entry (CE) Data section?
As a Homelessness Prevention team, you are considered an “Access Point” for CE. This is because Homelessness Prevention (HP) projects help triage clients to determine the most appropriate next steps to solve their long-term housing needs and immediate concerns if the prevention process fails. This is done by starting the CE process when the client is exiting your project. This means conducting a full needs assessment so the CE team can make referrals to housing.
This assessment data is recorded in HMIS only on the project exit form if the prevention process has failed. Leave this section blank until the client exits the project.
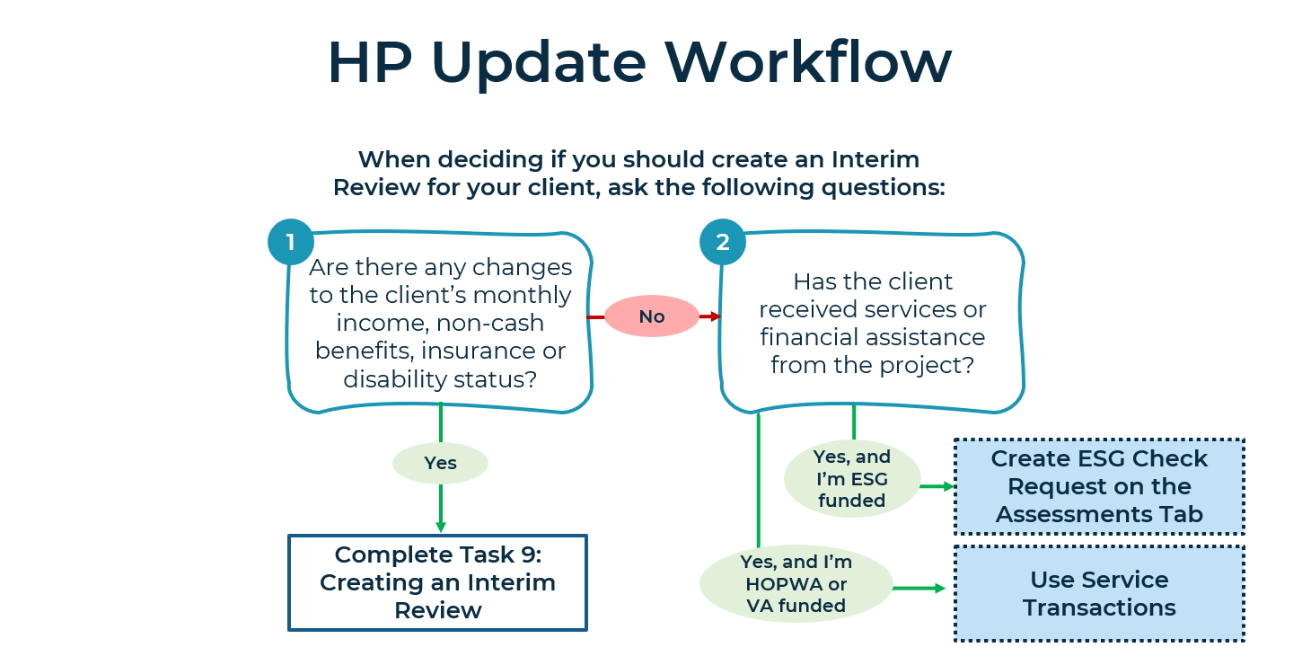
Task 9 – Creating an Interim Review
An interim review should be created on the Entry/Exit tab whenever you have communication from a client that there has been a change to their:
- Monthly income
- Non-cash benefits
- Insurance
- Disability Status
During this change, the Case Manager should give end dates to any benefits that have stopped or disabilities that have been resolved under the HUD Verifications section of the Interim Review. Then, new entries should be added to reflect the current status moving forward.
How should I track services and financial assistance I’ve given to the client?
You will only need to track the services given in HMIS if it is required by your project’s funder (ESG, HOPWA, or VA). Use the appropriate tool depending on your funder:
- ESG Check Requests
- Service Transactions
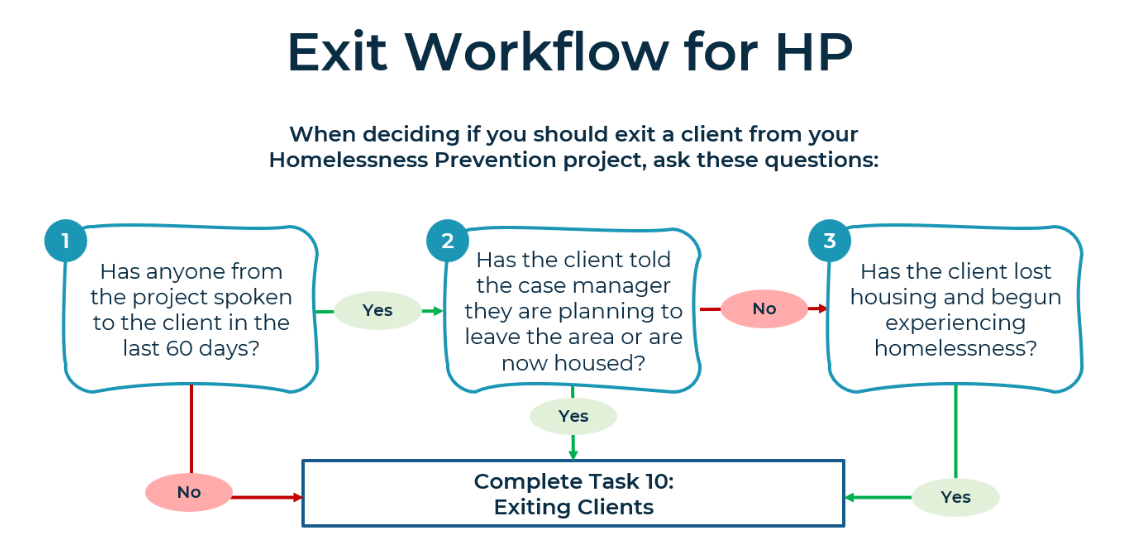
Task 10 – Exiting Clients
Case Managers should make every attempt to conduct exit interviews with their clients to get an accurate picture of where they will be living moving forward, also known as the Destination. Exiting clients from the HP project will not remove them from the By-name list for as long as they are enrolled in the Coordinated Entry (CE) HMIS Project.
What should you use for the Exit Date?
- If there has been no contact between the client and the project in the last 60 days… use the Back Date mode to exit the client on the last day services were given.
- If the client has left the area or communicates they are leaving the project… use the date you received this information as the exit date.
- If the client is now experiencing homelessness… use the last date they are housed as the exit date.
Should I use the Coordinated Entry (CE) data section now?
If you are not trained to complete the CE Assessment please leave this section blank and refer the client to one of our Coordinated Entry (CE) Access Points.
Coordinated Entry (CE) Access Points Contact Information
| Erie County | |
| Genesee St. Access Point
586 Genesee Street Buffalo, NY Phone: 716-819-8188 Open: Monday through Friday 7:00am-3:00pm |
Central Library Access Point
1 Lafayette Square, Buffalo, NY Phone: 716-367-8188 Open: Monday through Friday 8:30AM to 4:30PM |
| Genesee, Orleans, and Wyoming Counties | |
| Independent Living: Batavia
319 West Main Street Batavia, NY Phone: 585-815-8501 ext. 400 Open: 8:30am-5:00pm |
Independent Living: Albion
243 South Main Street Albion, NY Phone: 585-815-8501 ext. 421, 422 Open: 8:30am-5:00pm |
| Niagara County | |
| Heart, Love & Soul – Daybreak
924 Niagara Avenue Niagara Falls, NY Phone: 716-282-5687 Open: Monday through Friday 9:00am-3:00pm |
|
If you are trained to complete the CE Assessment please follow all the steps listed under Task 11.
Coordinated Entry (CE) Tasks in the Client File
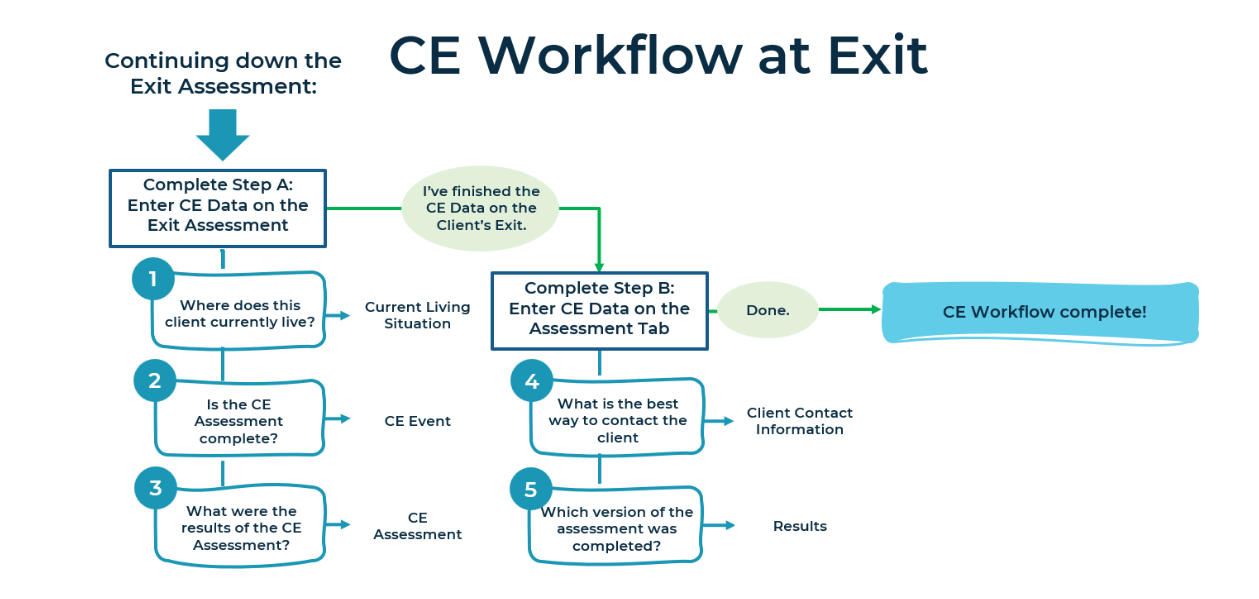
Task 11 – Entering CE Assessment Data on the Exit Assessment
The Coordinated Entry (CE) assessment process begins at intake (also called the Date of Engagement for Street Outreach) by entering the results of the survey.
Step A – Entry/Exit Tab
Getting your client added to the Housing Referrals list (also known as the By-Name list) starts with completing the Coordinated Entry Data section on the exit assessment.
- Current Living Situation
- CE Referral Event
- CE Assessment Results
Step B – Assessment Tab
To finalize their information, go to the Assessment Tab in the Client’s profile once the Exit Assessment is complete (on the same date). This tab will allow you to add the client’s contact information and your own. This information is very important for helping the CE Team contact clients once they have been referred to housing assistance. After this has been completed, select the version of the CE assessment that matches the one done by the client.
- Contact Information
- CE Assessment Results
Related Articles
Switching Between Projects (Enter Data As)
Changing the System Date (Back Date Mode)
Adding a Release of Information (ROI)
Adding Interim Reviews (Updates and Annual Assessments)
Uploading and Downloading Files
Still having trouble?
If you are still having issues with HP projects, please contact the HMIS Administration Team at [email protected].